Tuesday, December 20, 2011

Best-Ever Sugar Cookies

It's Holiday time!  That means time for me to go crazy making homemade candy (Cream-Filled Truffles, Chocolate Caramels), cookies, and other goodies (like my Hot Chocolate with Peppermint Chocolate Marshmallow Sticks).  I swear, if I ever quit my day job, it will be to open a place where I get to make these treats all of the time.

These sugar cookies have received rave reviews from anyone who eats them and after a little bit of tweaking, I finally think I have them just perfect.  This recipe yields about 60 cut-out cookies, which is just right for me to give some as gifts and leave some at home for us to nibble on.  The longest part of this process is the frosting, but it's fun (I cheesily blast Holiday tunes while I frost) and I look forward to a couple years from now when my son, Maxwell, can help me (instead of me frosting them while he naps).

I will admit that I wouldn't try to tweak the recipe to be healthier (shocking that I would say that, I realize), by adding whole wheat/less butter/other sweeteners or whatever, because I've been trying it for awhile and my results yield a mediocre cookie (using whole wheat flour) with less than stellar reviews.  So, enjoy this treat in moderation.

The frosting/icing recipe is found here (along with how to make Chocolate Sugar Cookies):

Ingredients:
1 1/2 Cups Butter, Softened
2 Cups White Sugar
4 Eggs
2 Tsp. Vanilla Extract (the real thing is better than imitation!)
4 1/2 Cups All-Purpose Flour (plus more for rolling out the dough)
2 Tsp. Baking Powder
1 tsp. Sea Salt

Directions:
1.  In a large bowl, cream together the butter and sugar until smooth.  Beat in eggs, one at a time.  Mix in the vanilla.
2.  Mix in the flour, sea salt, and baking powder (you might want to stir in the last cup by hand).
3.  Preheat oven to 400 degrees.
4.  Roll out dough (working with 1/3 the batter at a time) onto a floured surface.  Roll out the dough to 1/4" to 1/2" thickness.  Cut into shapes with cookie cutters.  Reroll scraps 2-3 more times and cut shapes into that (eventually dough will get too stiff and flour-y, so discard scraps after 2-3 re-rolls).
5.  Place cookies 1" apart on an ungreased cookie sheet.  Bake for 7-9 minutes, or until lightly browned on the bottom.  Transfer to wire rack to cool.

Serve plain or frost and decorate as desired (directions found here).

Enjoy!

Some Menorahs for my Jewish friends. 

Some Personalized Christmas Stocking Cookies

Wednesday, December 14, 2011

Skinny Cilantro-Lime Rice

Here is another recipe inspired by the awesomeness that is Chipotle.  I have also posted a recipe for making a complete mock-Chipotle burrito at home, and have separate recipes for cilantro-corn salsa and Barbacoa beef.  Enjoy this rice in a burrito, as a side dish, and with any Mexican-flavored fare.

Ingredients:
1 Cup Extra Long Grain Rice or Basmati Rice
2 Cups Water
1 Tbsp. Extra Virgin Olive Oil
Juice of 1/2 Lime (1 Tbsp Lime Juice)
1/2 tsp. Sea Salt
3 Tbsp. Cilantro, fresh and chopped

Directions:
1.  In a large saucepan, combine rice, water, and oil.  Bring to a boil until half of the water is evaporated
2.  Reduce heat to low, cover, and simmer for 15 minutes.  Turn off heat and let sit, covered for 5 more minutes.
3.  In a medium bowl, combine lime salt, cilantro, and rice and stir until well-combined.

Serve and enjoy.

Chipotle-Style Barbacoa Beef

In my quest to make Chipotle-style burritos at home, I decided to make Barbacoa beef.
Another thanks to Gina of Skinny Taste for her recipe of Chipotle's Barbacoa beef on behalf of my husband's stomach.  I did modify the recipe in terms of ingredients and directions, but used her recipe as the base.  I rarely make beef (personal preference) as it is generally less lean and heart healthy than my usual vegetarian, fish, or chicken dishes.  However, when you do want to make beef, here is a handy wallet card of the lean cuts of beef.  Feel free to serve this with my cilantro-corn salsa and cilantro-lime rice for a tasty meal.  I hope you enjoy the barbacoa beef in your own burritos, as a sandwich, over rice, or by itself!

Ingredients:
1 lb Beef (round roast--eye, bottom, or top), trimmed of fat
1/2 tsp. Black Pepper
1 Tbsp. Extra-Virgin Olive Oil
2 Tbsp. Minced Garlic
2 Tbsp. Minced Onion
1 Tbsp. Lime Juice
2 tsp. Chili Powder
2 tsp. Ground Cumin
1 tsp. Oregano
1 Bay Leaf
1/3 Cup Water

Directions:
1.  Trim fat from meat and cut into 4 inch pieces.  Put in crockpot/slow-cooker.
2.  Pour/place all of the ingredients in slow-cooker.  Turn heat to low and cook for 6-8 hours, or until meat is cooked through.  Remove bay leaf.
3.  Use two forks to pull the meat apart (shred it) once cooked through.  Cover and let cook for another 15-20 minutes. Serve immediately.

Enjoy as a spicy sandwich or for the meat in a Chipotle-inspired burrito.

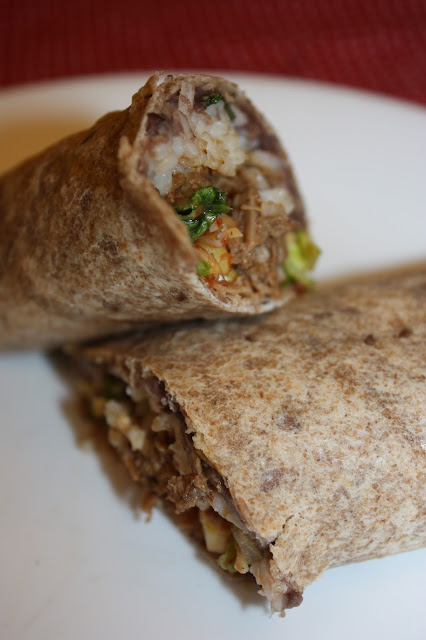
Mock-Chipotle Burrito

This past weekend, after a shopping extravaganza (well Holiday shopping), we stopped at Chipotle.  Although this is just another day for us (we love Chipotle), I sat there and realized I should attempt to make one of their meals at home.  After all, the way to a man's heart is through his stomach...and given Aaron's obsession with Chipotle, he'll be thinking quite positively of his wife come Christmastime.  And I'm hoping he doesn't actually read this blog post.  Ha ha.
Gina's skinny recipe was the inspiration for all of the Chipotle recipes, including Barbacoa Beef and Chili Chicken and Corn salsa.

Ingredients:
Tortillas (I used multi-grain flax, yum)
Beans (Black or Pinto--I used refried black actually)
Meat of choice (Chicken, Barbacoa, Steak, Carnitas, or meatless)
Cilantro-Corn Salsa (or other salsa)
Skinny Cilantro-Lime Rice
Romaine Lettuce, Chopped
Mexi-Blend Shredded Cheese
Sour Cream (optional)
Guacamole (optional)

Directions:
1.  One tortilla at a time, spoon on some beans (or smear on if using refried).  Top with meat, salsa, rice, lettuce, cheese, and sour cream or guac.
2.  Fold (or wrap up if your tortillas aren't huge) tightly and enjoy with a side of Jalapeno pepper sauce, or whatever sauce you prefer.

Serve and enjoy!

Cilantro-Corn Salsa


Corn salsa  is so good in a burrito or eaten with chips.  I love Chipotle's salsas and in my desire to replicate a Chipotle burrito at home, I made this salsa to serve with it.  This recipe was inspired by Gina of Skinny Taste's recipe...and by of course, Chipotle.

Ingredients:
2 Cups (10 oz) Sweet Corn, cooked (organic)
2 Tomatoes, diced (or 1 Can Diced toms)
3 Tbsp. Minced Onion (or 1/2 red onion, diced)
1 Jalapeno, diced (seeds removed unless you want it h-o-t)
3 Tbsp. Chopped Fresh Cilantro (or 3 tsp. dried)
3 Tbsp. Lime Juice (or juice from 1 1/2 Limes)
1/2 tsp. Chili Powder
1/2 tsp. Black Pepper

Directions:
1. Combine all ingredients well.  Refrigerate for 1 hour and serve.

Tuesday, December 13, 2011

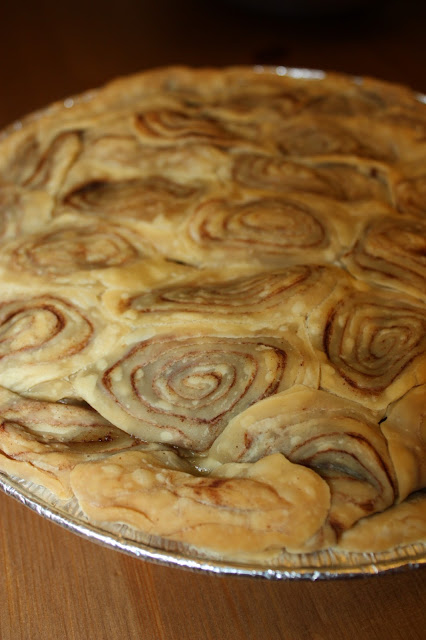
Cinnamon-Roll Pie Crust

Seriously--a pie crust made of cinnamon rolls!  This is such a fun recipe.  I saw a photo of a cinnamon-roll pie crust recently on Pinterest and had to do this myself.  Not only was this easy and great-tasting, but it looks unique (and yummy) and is sure to be a conversation-starter where you serve it (I brought it to a big family Thanksgiving in Massachusetts and it was a total hit).  I made it as an apple pie (hence, the need for two pie crusts--one to cover the filling), but you could try it with a number of different pies.  Pumpkin, pecan, or banana cream would all be great pies with this crust too.


Ingredients:
2 12" Pie Crusts (Premade or Homemade)
Ground Cinnamon
Pie Filling of Choice

Directions:
1.  Roll out one pie crust and sprinkle enough cinnamon on to cover the pie (about 1-2 tsp).  
2.  Tightly roll back up the pie crust and cut pie into 1/2" thick slices.  
3.  Lie the "cinnamon rolls" back down into a circular shape.  Using a rolling pin (and your fingers to make some seals tight), roll the cinnamon rolls together, sealing the edges together and making the pie about 1/4" thick (a 12" circle).
4.  Gently flip the pie crust over and use your fingers to seal together any major cracks or crevices.  
5.  With the help of a large flat spatula, carefully transfer the newly sealed pie crust into a pie tin or dish.  Use your fingers to seal back together any seals that came apart.  
6.  Pour in your pie filling of choice (in my case, apple filling).
7.  Repeat crust process for second pie crust (if using a double layer).  Place over top of filling and seal edges with bottom pie crust.
8.  Finish making your pie according to the directions (bake, refrigerate, etc).

Enjoy!