Showing posts with label candy. Show all posts

Sunday, November 13, 2011

Snicker Bar Cookies

In the spirit of using leftover (Halloween, or otherwise) candy to make bars or cookies, I decided to use up more of our leftover candy and make some Snickers Bar Cookies (if you're interested, see the recipe for Reese's Peanut Butter Blondie Bars here).
So, these awesome little morsels use Snickers candy bars with peanut butter cookie wrapped around them.  Then you drizzle a little chocolate icing on top and wa-la, a sweet treat.  Everything in moderation.  I won't put extra fats or sugars in most recipes, but I will always still post recipes for sweets.  I definitely enjoy unhealthy treats, but I believe a healthy lifestyle includes giving in to chocolate (and other sweets) every once in awhile.  Plus, you can always a modify a recipe by using light butter, agave (or other natural sweeteners), whole wheat flour (instead of all all-purpose), etc.   I hope you enjoy these!

Ingredients:
1/2 - 1 Package of Snickers Mini Snack Size Candy Bars (depending on how you cut them, see Directions #1).
3/4 Cup Light Butter (1 1/2 Sticks)
3/4 Cup Peanut Butter (I used organic and crunchy, but you can do whatever type you prefer)
1/4 Cup White Sugar
1/4 Cup Agave Nectar (or just use 1/2 Cup total White Sugar)
1/2 Cup Brown Sugar
2 Eggs
1 tsp. Vanilla Extract
2 Cups Whole Wheat Flour
1 Cup All-Purpose Flour
1 tsp. Baking Soda
1 tsp. Baking Powder
1/2 tsp. Sea Salt

Icing Ingredients:
1/4 Cup Cocoa Powder
1/2 Cup Powdered Sugar
1/2 tsp. Vanilla Extract
1/2 -1 Tbsp. Milk

Directions:
1.  Preheat oven to 350 degrees.  Cut candy bars in half or into fourths (I cut them into 4 pieces).
2.  Cream together the butter, peanut butter, and sugars.  Add in the eggs, one at a time, and the vanilla.
3.  Combine the dry ingredients in a separate bowl.  Slowly mix the dry ingredients in with the wet mixture (about 1 cup at a time).  Don't overmix, just until well-combined.
4.  Take a spoonful of dough and wrap around a piece of Snickers, roughly in a ball shape, completely covering the candy bar piece.  Place onto baking sheet about 2-3" apart.
5.  Bake for 10-12 minutes.  Cool on wire rack.

Icing Directions:
1.  Combine the icing ingredients (cocoa, powdered sugar, vanilla, and milk) in a small bowl.
2.  Drizzle over the cooled cookies.

Let dry and Enjoy!

Wednesday, November 2, 2011

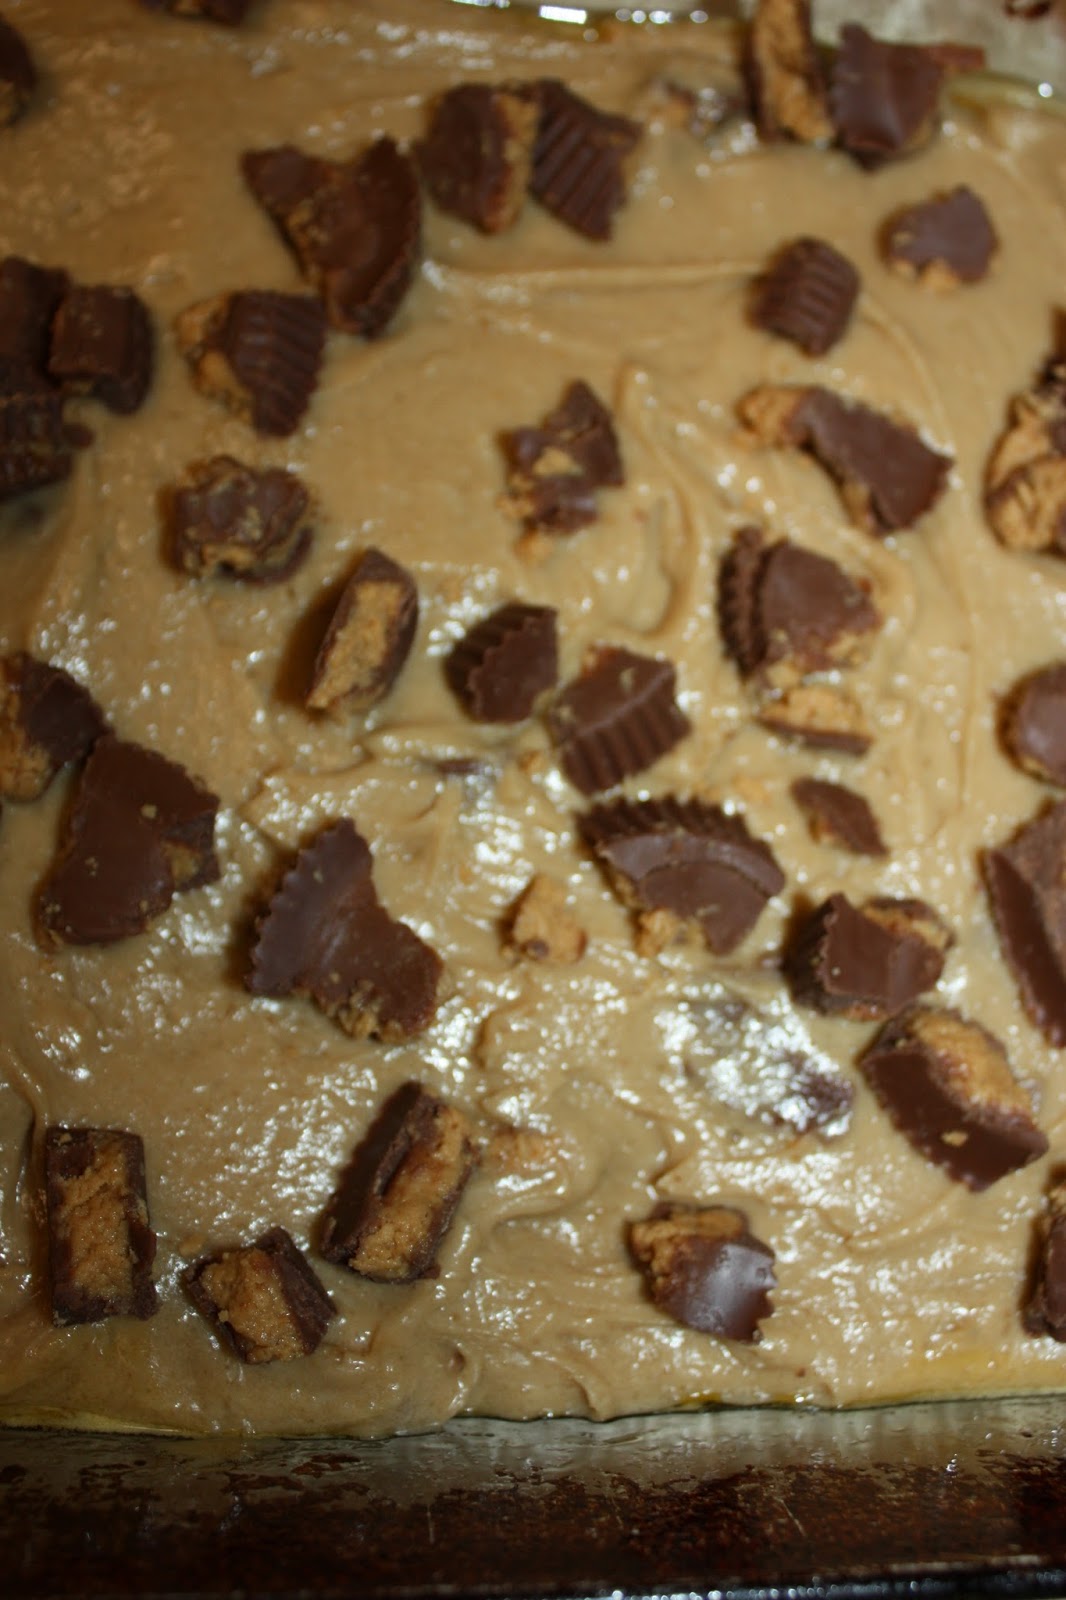
Reese's Peanut Butter Blondie Bars

The day after Halloween, I stared into our still-heaping bowl of Halloween candy and decided to make some blondie bars featuring some of the candy.  Although the bars are a quick and easy sweet treat, I'm not sure it was a good idea to make them (because I keep eating them).  I used Reese's Peanut Butter Cups, but blondie bars are pretty versatile and you could use a variety of other types of candy (Snickers, Milky Way, M&Ms, and the list goes on).

Ingredients:
1 to 1 1/2 Cups Peanut Butter Cups, broke into pieces (I used 6 regular size cups broken up)
1 Cup All-Purpose Flour (could do half whole wheat flour to make a bit healthier)
1/2 tsp. Sea Salt
1/2 Cup (8 Tbsp.) Light Butter, softened
1/2 Cup Light Brown Sugar, packed
1/3 Cup White Sugar (or Agave nectar)
1 Egg
1 tsp. Vanilla Extract

Directions:
1.  Preheat oven to 350 degrees.  Spray a 8x8 glass baking dish with cooking spray (or line with parchment paper with 1" overhang).
2.  Mix together the butter and sugars until well-combined.  Add in the egg and vanilla extract and continue mixing.
3. Slowly mix in the flour and salt.
4.  By hand, stir in half of the peanut butter cup pieces.
5.  Spread batter into baking dish.  Sprinkle remaining peanut butter cup pieces on top.  Bake at 350 degrees for 40-45 minutes, or until edges are lightly browned and a toothpick inserted into the middle comes out clean.

Enjoy!

Thursday, February 10, 2011

Cream-Filled Chocolate Truffles

With Valentine’s Day approaching, homemade candies make a great treat and a great gift!  Not only are they absolutely delicious, but they make a thoughtful and attractive gift with some cute boxes and tissue paper.  Everyone we've given them to has loved them.  

In this recipe, I made four different flavored truffles.  I made: White Chocolate Orange Crème Truffles, Dark Chocolate Blueberry Truffles, Milk Chocolate Hazlenut Truffles, and Milk Chocolate Raspberry Truffles.  Note that this recipe is great, because you can choose any flavor of filling you want, along with any flavor of chocolate (white, dark, or milk chocolate).  There are a number of combinations to choose from.

You'll need to stop by a cake/candy/baking store to pick up a truffle candy mold and the chocolate pieces.  You can also find dry fondant there.  I also get the flavoring there.  Flavorings will be oil-based in specialty shops, but generally alcohol-based in grocery stores.  Either is fine for truffle filling, but if you want to flavor the chocolates (not done in this specific recipe, but great for making Andes-like candy mints, etc), then you cannot use alcohol-based flavors or you'll ruin the chocolate (they won't mix and will clump together).  I went to Cakes Plus in Laurel, Maryland, but any cake/candy/baking store will do.

If you like this recipe and want to try making more homemade candies, you can also check out my Peanut Butter Cups and Chocolate Caramels recipes. 

Ingredients:


  • Dark Chocolate Pieces 
  • Milk Chocolate Pieces and/or
  • White Chocolate Pieces (I used all 3)
  • 3 Tbsp. Butter
  • 1 Tbsp. Milk
  • 1/2 Lb (8 oz) Dry Fondant (could substitute powdered sugar if you need to)
  • Food Flavoring of your choice (I used Blueberry, Raspberry, Chocolate Hazlenut, and Orange Crème)
  • Food Coloring of your choice


Directions
1.  Fill a medium skillet 1/3 full with hot water and simmer on stove top.  Fill a coffee cup with chocolate pieces and stir occasionally until they are melted (in the photo I have white chocolate, dark chocolate, and milk chocolate in cups, as I was making all three types of candy at once).


2.  While chocolate is melting, prepare filling.  Melt butter in a large bowl.  Stir in dry fondant and milk.  Separate into 4 (or however many flavors you have) smaller bowls.  Add in flavoring and food coloring and stir well, adding more to get to your desired filling color. 
3.  Spoon a small amount of chocolate into a candy mold and be sure to cover the sides, so no part of the mold is without chocolate (I just use the spoon for this and it works fine, but you can also use candy brushes if you so choose).  This may take some practice, to be sure you use as little chocolate as possible, while still covering all of the candy mold.  If you use too much chocolate, your candy will be hard to bite in to and you won't have adequate room for the filling.
4.  Place the candy mold flat in your refrigerator for 3-5 minutes, or until chocolate is set.
5.  Take a bit of the cream filling (small spoonfuls) and place into each individual candy mold.  Top with more chocolate to completely cover and fill the mold.  Lightly tap the entire candy mold on the counter when done, to remove any air bubbles.
6.  Place the candy mold back in the refrigerator for 5-7 minutes, or until completely set.  Remove from refrigerator, flip candy mold upside down on counter top and tap out each pieces. Remove any excess chocolate from the pieces.

Wa-La!  You have delicious cream-filled chocolate truffles!  Enjoy!


As a reminder, you can also make some homemade Peanut Butter Cups or Chocolate Caramels for a variety of homemade chocolate candies.

Chocolate Caramels

With Valentine’s Day approaching, homemade candies make a great treat and a great gift!  Not only are they absolutely delicious, but they make a thoughtful and attractive gift with some cute boxes and tissue paper.  Everyone we've given them to has loved them.  

In this recipe, I made milk chocolate caramels (although you could use dark chocolate if you prefer).

You'll need to stop by a cake/candy/baking store to pick up a caramel candy mold, chocolate pieces, and a giant hunk of caramel.  I went to Cakes Plus in Laurel, Maryland, but any cake/candy/baking store will do.

If you like this recipe and want to try making more homemade candies, you can also check out my Peanut Butter Cups and Cream-Filled Chocolate Truffles recipes.

Ingredients
  • Milk Chocolate Pieces
  • Hunk of Caramel


Directions
1. Fill a medium skillet 1/3 full of hot water and simmer on stove top.  Fill a coffee cup with chocolate pieces and stir occasionally until melted (in the photo, I have white, dark, and milk chocolate in cups, as I was making all three types of candy at once).
2.  While chocolate is melting, break caramel apart into small pieces (roughly roll into balls) that will fit easily inside the candy mold (they need to fit easily into the mold, because you'll also need room for the chocolate).  
3.  Spoon a small amount of chocolate into a candy mold and be sure to cover the sides, so no part of the mold is without chocolate (I just use the spoon for this and it works fine, but you can also use candy brushes if you so choose).  This may take some practice, to be sure you use as little chocolate as possible, while still covering all of the candy mold.  If you use too much chocolate, your candy will be hard to bite in to and you won't have adequate room for the caramel.
4.  Place the candy mold flat in your refrigerator for 3-5 minutes, or until chocolate is set.
5.  Take the caramel pieces and place into each individual candy mold.  Lightly press down on the caramel to fill the square space (not too hard or you'll crack the chocolate).  Top with more chocolate to completely cover and fill the mold.  Lightly tap the entire candy mold on the counter when done, to remove any air bubbles.
6.  Place the candy mold back in the refrigerator for 5-7 minutes, or until completely set.  Remove from refrigerator, flip candy mold upside down on counter top and tap out each pieces. Remove any excess chocolate from the pieces.

And now you have delicious, homemade chocolate caramels to enjoy or give as gifts!

Enjoy!

As a reminder, you can also view my Cream-Filled Chocolate Truffle recipe or Peanut Butter Cup recipe for more homemade candies to make along with the caramels!

Friday, December 24, 2010

Dark Chocolate Peanut Butter Cups


If you know me, you know I love to make homemade Holiday candies!  Not only are they absolutely delicious, but they make great Holiday gifts in some cute boxes and tissue paper.  Everyone we've given them to has loved them.  In this recipe, I made one of my favorites, dark chocolate peanut butter cups.  Of course, you can always substitute milk chocolate for the dark chocolate if you prefer.

You'll also need to stop by a cake/candy/baking store to pick up a candy mold and the chocolate pieces.  You can also find dry fondant there.  I went to Cakes Plus in Laurel, Maryland, but any cake/candy/baking store will do.

If you like this recipe and want to try out more homemade candies, try my: Cream-Filled Chocolate Truffles and my Chocolate Caramels.


Ingredients:
Dark Chocolate Pieces
2 Tbsp. Butter
1 Cup Crunchy Peanut Butter (I love Crazy Richard's)
1/2 Cup Dry Fondant (or Powdered Sugar)

Directions:
1.  Fill a medium skillet 1/3 full with hot water and simmer on stove top.  Fill a coffee cup with dark chocolate pieces and stir occasionally until they are melted (in the photo I also have white chocolate and milk chocolate in cups, as I was making multiple types of candy at once).
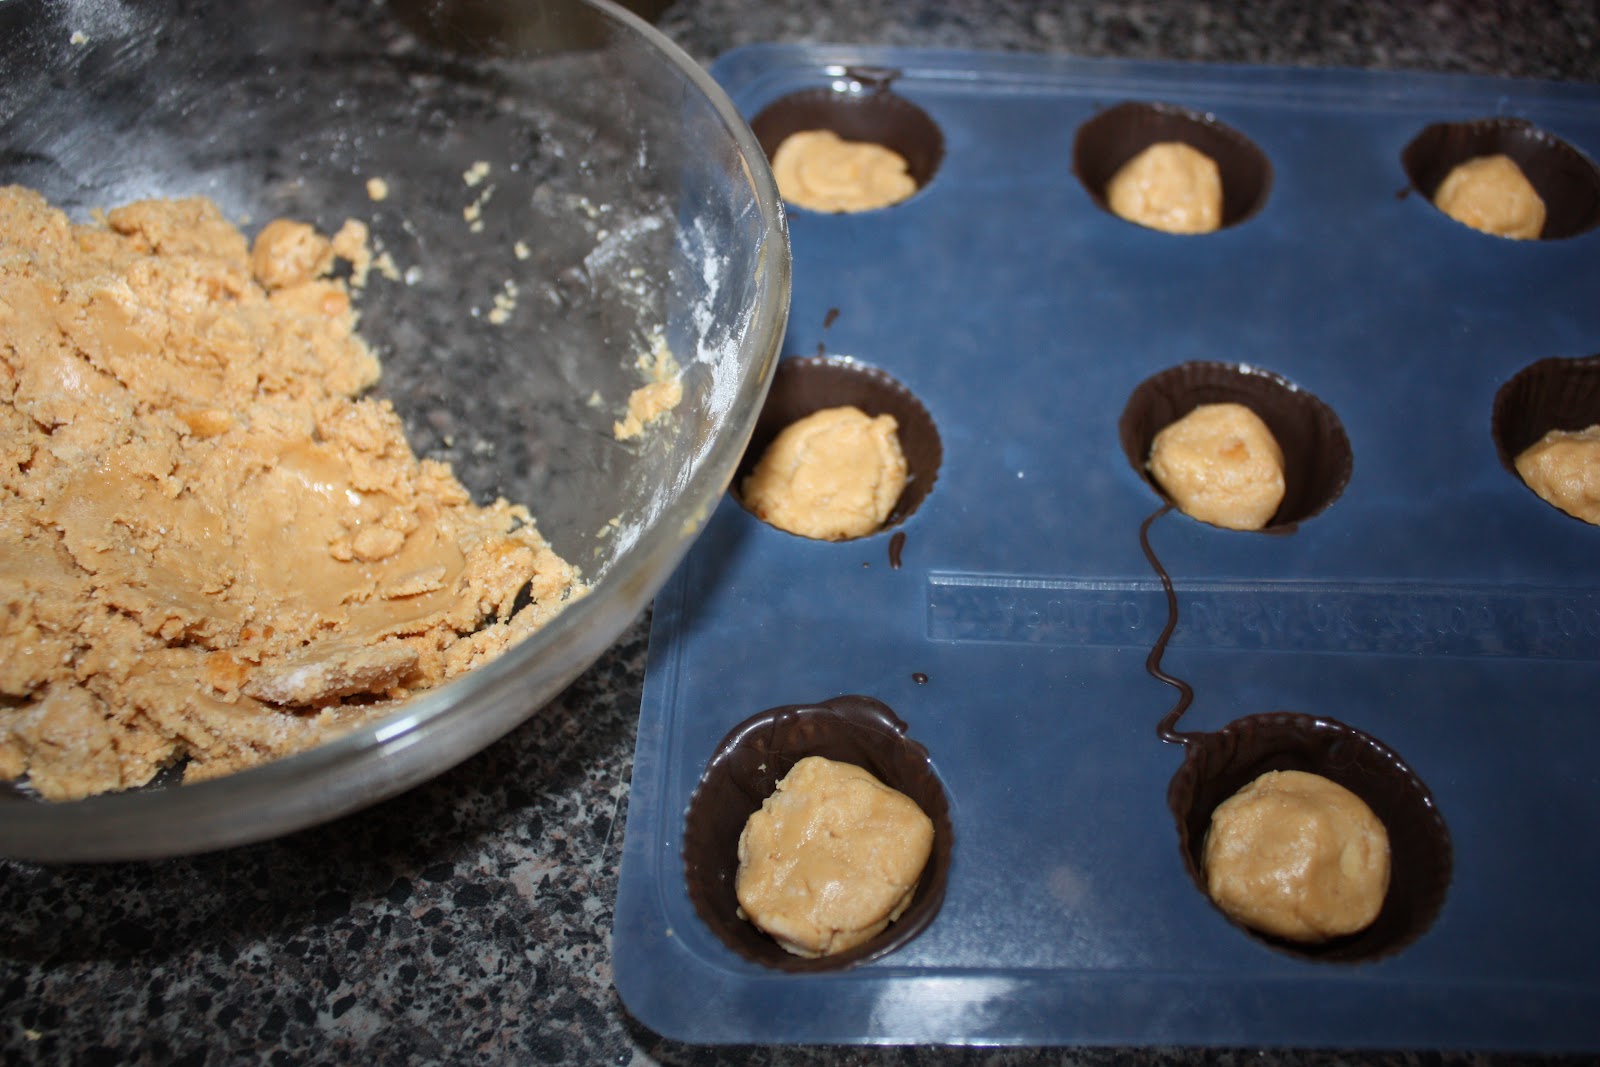
2.  While chocolate is melting, prepare filling.  Melt butter in a bowl.  Stir in peanut butter and dry fondant until well-combined.
3.  Spoon a small amount of chocolate into a candy mold and be sure to cover the sides, so no part of the mold is without chocolate (I just use the spoon for this and it works fine, but you can also use candy brushes if you so choose).  This may take some practice, to be sure you use as little chocolate as possible, while still covering all of the candy mold.  If you use too much chocolate, your candy will be hard to bite in to and you won't have adequate room for the filling.
4.  Place the candy mold flat in your refrigerator for 3-5 minutes, or until set.
5.  Take a bit of the peanut butter filling (roughly form into a ball) and place into each individual candy mold.  Top with more dark chocolate to completely cover and fill the filling.  Lightly tap the entire candy mold on the counter when done, to remove any air bubbles.
6.  Place the candy mold back in the refrigerator for 5-7 minutes, or until completely set.  Remove from refrigerator, flip candy mold upside down on counter top and tap out each pieces. Remove any excess chocolate from the pieces.

Wa-La!  You have delicious peanut butter cups!  Enjoy!